
Frequently Asked Questions: All covered in one convenient place.
How does a Printroom account work?
To choose whether to sign up for a Pro Account or a Standard Account, compare the benefits of a Pro Account to a Standard Account.To sign up for a Pro Account: You can either upgrade your existing Printroom account or set up a new Pro Account. With a Pro Studio Account, you create your own personalized studio home page and upload your photos into customized galleries. Your customers can then view and order your photos online. Printroom takes care of the printing, shipping, and business transactions so you can focus on what you do best . . . taking great photographs!
Click here to sign up for a Standard Account.
How do I make money using Pro Studios (Pro Account only)?
When you create an online gallery, you determine what print sizes and/or other products (greeting cards and gift items ) you want to offer and the price for each print size and/or product. The price of each print and product must be set above that of our standard price list. On all Pro studio account sales, Printroom will charge our standard prices of prints and products + 16% (13% commission and 3% credit card processing fee) on your sale prices. Checks for the remaining balance will be distributed to you on a monthly basis. You can monitor your real-time sales data online via your account at any time.How much does it cost to set-up a Professional Studio (Pro Account only)?
The annual membership fee is $99.00 per year to maintain a Pro studio. The fees and prices include 300MB of storage (about 6,000 thumbnails), customization of your studio home page and galleries, and order processing and fulfillment for your customers. We will also waive the $99.00 annual membership fee for the following year if you achieve $3000 in total sales for the current year.How do I get paid (Pro Account only)?
Printroom will distribute checks to Pro members on a monthly basis. Our current practice is to mail checks for your account balance (for shipped orders) as of the end of the previous month on the 15th of the current month. The checks will be made out to the payee name and payee address you specify when you sign-up for a Pro Studio. This information can be changed by clicking on ”My Profile” from your ”My Account” page.How does Printroom protect and secure my photos so others cannot copy and print?
Printroom offers the highest protection for copyrighted images. Only low-resolution thumbnails or watermarked (Pro Account only) medium-size files are displayed. Full-size images are stored in Printroom’s secure server and are only used to print photographs. Also, we offer anti right-click protections against unlawful image downloads.What are your Terms of Service for Pro Studios?
The Terms of Service describe the way in which you may use the Professional Studio services.What technology do you use to print photographs?
For standard prints on photo paper, Printroom uses digital printers with the highest quality silver halide chemical process–the same process used by regular photo finishers. This is direct digital continuous-tone printing, which produces stunning photographic prints far superior to ink-jets or dye sublimation printers. Some of our gift products such as t-shirts and photo mugs do use a dye sublimation process, however. Click here for more information.Will my prints last?
Printroom’s photographs LAST! With our state-of-the-art printing process, images will not fade away and the long-term results are the same as standard high-quality 35mm photos. Our glossy, matte, and pro luster finishes are printed with Fuji Crystal Archive paper. For more detailed information regarding the display-life of this paper click here. Our metallic prints are printed with Kodak Professional Endura Metallic paper which has a display-life rated at 100 years in a typical home display, 200 years in dark storage, and 1-5 years in a commercial display. Our black and white prints are printed with Ilford Pearl RC paper.What is your privacy policy?
Printroom has a firm commitment to ensuring the privacy of your images. This page will provide you with Printroom’s information gathering and dissemination practices. Please see our privacy policy for more information.What is a studio home page (Pro Account only)?
Your studio home page is the first page your customers will see when they enter your site. When you sign up for a Pro Studio, you will select your own studio home page: i.e. www.printroom.com/pro/yourcompanyname. You can also purchase your own domain name through a domain name registrar such as GoDaddy.com and have this page redirect to your Printroom address if you like. You may give this address to all of your customers. Your studio home page can be customized to add your own logo/icon, portfolio images, contact information, and a brief description of your business. At the bottom of your home page will be a list of all your gallery names and links to photographs. These galleries can be password-protected so only those who have the password can view them.How do I customize my studio home page?
Once you log in, click on the ”Storefront Setup” button. This page will walk you through six steps to personalize and customize your home page:-
Step 1. Upload company logo or icon. You have the option to use our Printroom default logo or you may upload your own. You may use either .jpg or .gif files. We recommend the image be no greater than 220 pixels wide by 83 pixels high@ 72dpi and in RGB mode. Note: we will not resize or change the format of the image.
Step 2. Upload 1-3 images to display in your portfolio. If you upload 2 or 3 images, they will rotate on your studio home page every few seconds. If you choose not to upload any images, we will use our default image. We recommend using portrait images and they must be in .jpg format. The images will be resized to fit into the portfolio window.
Step 3. Your contact information. Update or change any of your contact information.
Step 4. Studio name and description. Enter your studio or company name and a brief description of your business–512 characters or less.
Step 5. Select a studio style. We have 19 color schemes to choose from to best match your line of business. Click here to see sample studio home pages.
Step 6. Preview your studio home page. This preview allows you to take a look at your studio home page. You may either save the changes or go back to ”Storefront Setup” and continue making changes.
What is a gallery?
A gallery is what you set up to display your images from a particular event. When you set up a new gallery with our Pro Studio Manager software (Pro Account only), or your account page (Standard Account), you will have the option to select gallery name, print sizes, products (greeting card and gift items ), print/product prices, background colors, security, and more. All gallery names will be displayed on your studio home page if published.How do I create a new gallery?
Pro Account: Use our Pro Studio Manager software.Standard Account: Once you log in and you are at your account page, you will see a button ”Create Gallery.” This will take you to a new page to set up your gallery.
What is a Group?
A group is simply a container for galleries. It represents a designated event allowing you to categorize galleries from different times or portions of that event into one group. For instance; instead of creating one large gallery containing all of the images for a wedding, you could create individual galleries for each portion of the wedding, such as the ceremony and reception, and move those galleries into a group. This way, a customer can go directly to the portion of the wedding they’re interested in without having to search through a much larger gallery. When you set up a new group from your account page, you will have the option to select a group name, security, client access, and more. Just like you would a gallery. These settings can also be applied to the galleries within this group. All group names will be displayed on your studio home page if published. For more information, click here.How do I move a gallery into a group?
To move a gallery into a group, login to your account and click on the ”Organize Groups” button. You will see a list of all of your galleries and groups, each with a checkbox next to it. Check the checkbox next to the gallery you want to move. Check the box labeled ”Inherit price list and other options of the new parent group.” to have the gallery inherit the group’s settings. Use the ”Move to group:” drop-down box to select the group you want to move the gallery into. You can move a group into another group using this same method.How do I select the prints and/or products I wish to offer and how do I set the prices?
From your ”My Account” page, click the ”Price List”. Here, you can select from a list of pre-existing price lists or you can create a new price list. To create a new price list, click the ”Create New” button. Then type in a name for the price list and choose to base this price list on an existing price list if you like. Then click ”Create” and choose a recommended price category. This will affect the recommended price that appears when you select a product to offer. Each category has been based on market averages as well as prices used from our own accounts who have done very well. To offer a product, check the box next to it. The price that appears on the right is our recommended price for that product. On the far right you will see your profit if the product is sold for that price. This will change accordingly when the price is changed. Once you’re finished, click ”Update” at the bottom to save the changes. The price list is now available to be used with a gallery. The prices can always be changed later by going to the price list button under ”My Account” and clicking edit next to that price list.What security options are available when I set up a gallery?
On the new gallery set-up page, you will have three levels of security to choose from. The first selection is ”public” versus ”protected’. If you select ”protected” and enter a password, only those who have the password will be able to access this gallery. The second option is to display or not display the image caption. The third option gives you the ability to control how your gallery is viewed.Here are the different options with descriptions:
Searchable globally in Printroom–This means the gallery can be searched for just from Printroom’s home page or your own studio home page.
Studio search only listed–This means the gallery can only be searched for from your studio home page.
Studio search only unlisted– This means the gallery can only be searched for from your studio home page and it will not be listed there.
Studio search exact match unlisted– This means the gallery can only be searched for from your studio home page and the name has to be typed in correctly with spaces and spelling to return a result.
Searchable globally in Printroom–This means the gallery can be searched for just from Printroom’s home page or your own studio home page.
Studio search only listed–This means the gallery can only be searched for from your studio home page.
Studio search only unlisted– This means the gallery can only be searched for from your studio home page and it will not be listed there.
Studio search exact match unlisted– This means the gallery can only be searched for from your studio home page and the name has to be typed in correctly with spaces and spelling to return a result.
How do I change the style of my galleries?
Each time you set up a new gallery, you will have the option to change the background color and style. Go to ”My Account” and choose a gallery. Click ”Profile/Edit”. Under ”Background” you will have 20 creative styles to choose from.What is the publish/unpublish button used for in the ”New Gallery/New Group” and the ”Gallery Profile/Group Profile” pages?
Your gallery/group cannot be viewed by anyone until the publish button is selected. This allows you to upload your images, set your pricing/options, and make any necessary changes before your customers visit your site. Once the gallery is published, your customers will be able to view your gallery. Note: the publish button will change to unpublish once selected. You may select unpublish at any time to disable public access.How many images can I have in a gallery?
There is no limit on the number of images in a gallery, but your gallery will only display 36 images per page. The 37th picture and any others following it will be displayed on the 2nd page.Do my customers have to be a member to access my galleries?
No. Anyone may access and view your gallery as long as it is published and they have the password (if protected).What are global defaults?
Global defaults, accessible as a button on your ”My Account” page, gives you the ability to set pricing and gallery/group settings at a global level. This way you can apply the same settings to all of your galleries and groups at one time.What is the total number of images I can store?
There is no limit on the number of photos you can store. Note that when using our Pro Studio Manager software (Pro Account only) to create and upload thumbnail versions of your images, the impact on your storage space will be far less than uploading full-size images. Thumbnails created by the Pro Studio Manager software typically range in size from 20kb to 50kb. We give you 300MB of thumbnail storage with your new Pro Account. With 300MB of space, you should be able to store around 5000-7000 thumbnail images. As long as you upload thumbnails first, using Pro Studio Manager, the storage for your high-res images is unlimited. If you need to upload more than 5000 thumbnails, you may purchase additional storage for $20 per 100MB. This is a one-time fee and will remain in your account as long as it is active.If you have a Standard Account, the number of images that can be stored within 200 MB of storage space will vary depending on factors such as image resolution, compression, and picture detail. In general, high-resolution images or images with complicated backgrounds versus same-color backgrounds will require more storage space. A 3.2 megapixel image can vary from 250KB to 2MB in size, depending on these factors. On average, a 3.2 megapixel picture taken under normal lighting conditions with average details should require 750KB to 1.5MB of space. To view your total number of photos and capacity, simply log in and click on ”My Account”.
How do I know how much space/capacity I have in my account?
First you must login or become a member. Next, go to the ”My Account” page and you will see your total space used and your total space available on the right side of the page.Can I add additional storage to my account?
When you open a Pro Account, you automatically receive 300MB of storage capacity–200MB for a Standard Account. If you need additional space, you may either delete images from your galleries or purchase additional storage for $20.00 per 100MB. This is a one-time fee. The extra storage will remain in your account as long as it is active. To purchase additional space, log in to the ”My Account” page and you will see your total space used and your total space available on the page. Click on the ”purchase” icon on the right side of the page and follow the instructions (Note: the minimum purchase is 100MB and you must order in blocks of 100MB). Once you confirm your order, your account will include the new capacity.Do you offer image archiving?
Not really. We do our best to make sure that your images are safe with regular system maintenance and backups. Guaranteed archiving is a much more complicated and expensive process. Among other things, it requires storing multiple copies in multiple geographic locations. We are considering offering such services in the future. Even then it would be advisable for you to keep your own copies, just in case.How do I host image files on other web sites?
Unfortunately, this feature is no longer offered.How many galleries can I have?
There is no limit on the number of galleries you can have in your account.Where do I tell my customers to go so they can find the correct gallery?
We recommend supplying your customers with your url and the gallery name.What resolution images can be used to make photographs?
The following chart gives you guidelines to achieve the best quality results.| Print Sizes | Good | Best |
| wallets (4) | 338×448 | 507×672 |
| 8 die-cut wallets | 338×448 | 507×672 |
| 3.5×5 | 350×500 | 525×750 |
| 4×5 | 400×500 | 600×750 |
| 4×6 | 400×600 | 600×900 |
| 4×7 | 400×700 | 600×1050 |
| 4×8 | 400×800 | 600×1200 |
| 5×5 | 500×500 | 750×750 |
| 5×7 | 500×700 | 750×1050 |
| 6×9 | 600×900 | 900×1350 |
| 6×18 | 600×1800 | 900×2700 |
| 8×8 | 800×800 | 1200×1200 |
| 8×10 | 800×1000 | 1200×1500 |
| 8×12 | 800×1200 | 1200×1800 |
| 8×24 | 800×2400 | 1200×3600 |
| 9×12 | 900×1200 | 1350×1800 |
| 10×10 | 1000×1000 | 1500×1500 |
| Print Sizes | Good | Best |
| 10×12 | 1000×1200 | 1500×1800 |
| 10×15 | 1000×1500 | 1500×2250 |
| 10×20 | 1000×2000 | 1500×3000 |
| 11×14 | 1100×1400 | 1650×2100 |
| 12×18 | 1200×1800 | 1800×2700 |
| 12×24 | 1200×2400 | 1800×3600 |
| 12×36 | 1200×3600 | 1800×5400 |
| 16×20 | 1600×2000 | 2400×3000 |
| 16×24 | 1600×2400 | 2400×3600 |
| 20×24 | 2000×2400 | 3000×3600 |
| 20×30 | 2000×3000 | 3000×4500 |
| 24×30 | 2400×3000 | 3600×4500 |
| 24×36 | 2400×3600 | 3600×5400 |
| 30×40 | 3000×4000 | 3750×5000 |
| 32×48 | 3200×4800 | 4000×6000 |
| 40×50 | 4000×5000 | 4000×5000 |
| 40×60 | 4000×6000 | 4000×6000 |
Do you enhance images before printing?
Printroom gives you complete control over your prints. You have three options for image enhancement:- Color Managed Workflow. If you edit your image, you can take advantage of our color managed print workflow by downloading our ICC profile and using that to edit your images. Click here for more info about Color Management
- Custom Image Enhancement. If you want professionally-edited images, you can have Printroom’s image enhancement technicians manually edit and enhance your image for a small additional fee. Custom image enhancement can be ordered for any image in your galleries or you can choose to have it only done to an image as it is ordered by your customer. Click here for more information about Image Enhancement
- Auto Correct. If your images only need minor adjustments, try Printroom’s Auto Correct option. Select the Auto Correct option to enhance contrast, sharpness, and color balance.
- Standard Enhancement (Pro Account only). If your images need further corrections, standard enhancement provides exposure and color corrections performed by a trained professional. Standard enhancement is $.99 per image the first time it’s ordered. This means, if it is ordered again, we will use the same standard enhanced image with the new order and any subsequent orders without any additional charges.
- Premium Enhancement (Pro Account only). If your images require the utmost attention to detail, premium enhancement provides red eye removal, exposure correction, color correction, facial retouching, and sharpening. Premium enhancement is $1.99 per image the first time it’s ordered. If it is ordered again, we will use the same premium-enhanced image with the new order and any subsequent orders without any additional charges.
What is Crop & Border?
Crop & Border allows you to select how your image will be printed. You now have the ability to remove unwanted white borders when an image has proportions different from the selected print size (the image is either too long or too square). After you select the quantities and size of prints in the shopping cart, you will have 4 crop options and 4 border options to choose from. The example below shows an image with different proportions. If no crop is selected, the print will default to the ”Center” crop option. You may either select ”no cropping” and keep the white borders or select the ”best crop” from the Crop & Border options. If the image’s proportions are similar to the standard size print, the crop options will have little or no effect.




What is a Team and Player poster and how can I order it?
Posters containing player and team images are available for a variety of sports. They have configurable graphics and text and are available in 8×10, 11×14 and 16×20 sizes. A professional photographer can order a T&P; poster or offer it as an item for sale. A poster can be ordered from a gallery only if the gallery contains an image named or having a caption containing ”TEAMPIC”. (This text shouldn’t contain spaces and it is not case sensitive). The ”TEAMPIC” image is automatically used as the team picture. A poster can not be ordered for the TEAMPIC image itself.Can my customers purchase photo greeting cards or photo gifts from Pro Studio galleries?
Yes. You need to specify the items you want to offer and prices in the price list for each gallery.Do you use secure ordering?
Yes. When you place an order or become a member, all information (including the credit card transaction) is encrypted using secure socket layer (SSL) before it is sent over the internet. Our Secured Server can only read this information and data.How long will it take to ship my photographs?
Standard prints: (no frame) 2-3 days*Standard frame: 7-10 days*
Frame w/etched glass, field dirt, or ticket: 4-6 weeks*
Note: Framed products shipped separately from standard (no frame) prints.
How do I redeem coupons or promotions?
Printroom.com offers four types of coupons and discounts:Credit-Based Coupons:
These coupons credit your account with free prints, etc. These coupons are available only through specific promotions to members of Printroom. To redeem credit-based coupons, you must be logged-In while placing your order. If you do not use all of your credits, the balance will be maintained in your account. You may use only one coupon type per order (credit-based, photo pass, or gift certificate). If you have any credit-based coupons in your account, these will be applied to your order unless you specify a photo pass or gift certificate.
Photo Passes: These coupons can only be used once–with one order only–and cover specific products. To redeem your photo pass, simply specify the coupon number at the top of the billing page. You may only use one coupon type per order (credit-based, photo pass, or gift certificate). If you specify a photo pass in the billing page, none of your credit-based coupons will be applied to the order.
Gift Certificates: These coupons can be used throughout multiple orders until their balance is used. They can cover any product because, unlike photo passes, they have a dollar value rather than a product value. You may use multiple gift certificates in a single order.
Volume Discount: We also offer volume discounts on orders over a certain dollar amount. To qualify for the volume discount, your order must exceed the dollar value after factoring in any other coupons and/or promotions. The volume discount will be applied automatically to all qualified orders. The combined total of all coupons, promotions and discounts will be reflected in the ”Final Purchase Approval” page. Click here to view the Terms and Conditions of a specific coupon, photo pass, or gift certificates and to check the balance.
These coupons credit your account with free prints, etc. These coupons are available only through specific promotions to members of Printroom. To redeem credit-based coupons, you must be logged-In while placing your order. If you do not use all of your credits, the balance will be maintained in your account. You may use only one coupon type per order (credit-based, photo pass, or gift certificate). If you have any credit-based coupons in your account, these will be applied to your order unless you specify a photo pass or gift certificate.
Photo Passes: These coupons can only be used once–with one order only–and cover specific products. To redeem your photo pass, simply specify the coupon number at the top of the billing page. You may only use one coupon type per order (credit-based, photo pass, or gift certificate). If you specify a photo pass in the billing page, none of your credit-based coupons will be applied to the order.
Gift Certificates: These coupons can be used throughout multiple orders until their balance is used. They can cover any product because, unlike photo passes, they have a dollar value rather than a product value. You may use multiple gift certificates in a single order.
Volume Discount: We also offer volume discounts on orders over a certain dollar amount. To qualify for the volume discount, your order must exceed the dollar value after factoring in any other coupons and/or promotions. The volume discount will be applied automatically to all qualified orders. The combined total of all coupons, promotions and discounts will be reflected in the ”Final Purchase Approval” page. Click here to view the Terms and Conditions of a specific coupon, photo pass, or gift certificates and to check the balance.
How do I change my order or check its status?
Once you are logged in, click on the ”Lab Orders” button (Pro Accounts only). There you will see a summary of all your orders including the order number, date, amount, and order status. You may click on any order number to view the order details. If the order status is processing, you can still change or modify your address (not state due to tax implications), paper type, crop & border, and auto correct. Once the order has been printed, no changes will be accepted.How do I check the order status for my customers?
Go to your ”My Account” page. Click on ”Sales Report.” On this page you will be able to view all orders placed in any given month. Simply click on the order number and you can view all the images ordered and see the order status.How do I upload images?
Uploading is now easier than ever. You may select from the following options:- Pro Account: Pro Studio Manager is by far the preferred method of creating galleries and uploading images for a Pro Account. Find out more about Pro Studio Manager.
- Standard Account: To upload images for a Standard Account, use the Drag & Drop plug-in or Standard Browser Upload method, both described below.
What is Drag & Drop Plug-In?
Drag & Drop Plug-In is an easy-to-use image-upload method available for installation online. With Drag & Drop installed, you can upload your photos into your online galleries or shopping cart by simply clicking (or checking) the image files you want to upload. Drag and drop them into the Drag & Drop’s blue target. After clicking the ”Send Images” button, the image files will be uploaded to your desired destination. Standard members can upload up to 36 images at a time. Pro members can upload up to 252 images at a time.How to install Drag & Drop Plug-In:
Install Instructions for PC users (Supports Windows 95 or higher, Windows NT):
Microsoft Internet Explorer:
- Go to upload section where Drag & Drop is located.
- On the bottom of ”Upload Images” section, click ”Install Drag & Drop uploader Active X”
- Click ”Yes” button on security dialog
- The Drag & Drop Upload window will appear
- Go to upload section where Drag & Drop is located.
- Make sure that ”Drag & Drop” upload method is chosen over ”Standard Browser” method. If not, then click ”Upload images using Drag-and-Drop method”. When ready to use, your screen should look like this:
![[cascade screenshot]](https://www.printroom.com/files/img/drag-and-drop-image.gif)
- You must arrange your application windows in such a way that you can see the Drag & Drop upload box (the one with the blue ”target” box in it) and the location of your image files at the same time. Your screen should look like the following:
![[cascade screenshot]](https://www.printroom.com/files/img/cascaded-windows-2.gif)
Reduce the current screen window to smaller size by clicking the ”restore down” button on the upper right corner of the window screen. The ”restore down” button is the middle button in the below image:
![[restore buttons]](https://www.printroom.com/files/img/restore-cropped.gif)
![[windows explorer screen shot]](https://www.printroom.com/files/img/windows-explorer.gif)
- Left-click on the image file you want to upload (it has to be an image .jpg file) and while holding down the button, move the mouse pointer to the blue ”target” on the other window and release the left button on the mouse.
- You can upload multiple files at the same time by first highlighting all of the files with your mouse and then dragging all of them to the Drag & Drop box.
- When all your image files are in the Drag & Drop box, click on ”Send Images” button in the bottom right corner of the box.
- Go to upload section where ”Standard Browser Upload” is located.
- Make sure that ”Standard Browser” upload method is chosen over ”Drag & Drop”. If not, then click ”Use Standard Browser”. When ready to use, your screen should look like this:
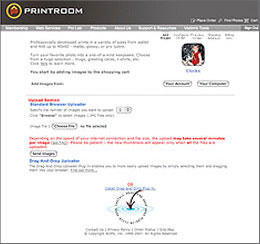
- Simply specify the number of images you wish to upload (up to 36 photos).
- Click the ”Browse” button to browse and search the directory and image files you want to upload.
- In the pop-up window, select the image file (one at a time) by clicking on the file name. Then click ”Open”.
- Repeat 4 and 5 until completed.
- Click the ”Send Images” button when complete.
I click the ”Browse” button, but I don’t see any image files in the new ”File Upload” window. I am in the correct folder and I know they should be there.
You need to select ”All Files” from the ”File of type” dropdown menu to see all the files in the folder.How long does it take to upload my images?
Pro Account: With our Pro Studio Manager software, uploading thumbnails (which it creates for you) generally takes between 2-3 seconds per image. About 20x faster than uploading full-size images through a Standard Account.Standard Account: It depends on the speed of your internet connection and the size of the image file. It takes about 1 to 3 minutes to upload a single 2MB file over a typical 768 kbps broadband connection. So, for 10 such images, it may take 30 minutes to complete the upload.
What file formats do you support?
We support only JPEG files.How can I tell that the upload is complete?
Most browsers do not allow display of the progress messages while the upload takes place. You will see the thumbnail pictures of the new images only when all the files are uploaded. There will be no messages while the upload is in progress, so please be patient.Can I mail in a CD-ROM with full-size image files for you to upload? (Pro Account only)
Yes, although our Pro Studio Manager is, by far, the most convenient method of uploading your full-size images to Printroom. The price is $0.03 per image (credit cards only) with a minimum of $10.00 (covers 333 images). Your credit card will be billed after upload is complete. We can only accept images from Pro Studio Manager that were previously synchronized in galleries as thumbnails to your account.Please follow these directions to make sure the contents of media is correct: Click ”CD-ROM Acceptance” for the submission form. Please fill out the form completely and click the ”Submit” button. A confirmation will be e-mailed to the address specified on the form. Print the form and mail it to Printroom together with your CD-ROM. Once we upload the images into your gallery, we will notify you by email, so that you can set up prices and products to offer.